How to fit heated screens
Get ready for winter and avoid misted and frozen screens by fitting a heated windscreen kit. Gary Stretton shows how
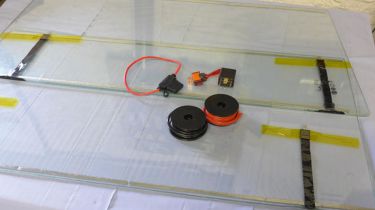
Series Land Rovers and Defenders suffer from marginal windscreen demisting capabilities and a battle with ice inside as well as outside their screens in colder weather. Modern heated screens are fast-acting and very reliable. In the case of these Ricky Evans Motorsport screens, they are also laminated as standard, making them preferable to toughened screens should the unfortunate happen.
Although we show them here being fitted to my Series III, they are also available for Defender models. Heated screens are no more difficult to fit than standard screens, albeit with some straightforward wiring involved. The best way to tackle this job is to consider it to be two distinct tasks; fitting the screens and fitting the wiring.
Having removed your old screens, you may wish to carry out additional remedial work to the screen frames, or to the top of the bulkhead, so try to factor such work in when allowing time for the job. While the fascia top rail (dash top) is removed from your Series III, it’s the ideal time to consider recovering it, if necessary, with fresh vinyl.
Some Series screen frames have very pronounced welds in their corners. You must factor these in when fitting the sealing strip. If necessary, grind them down slightly to avoid glass to frame contact which could crack the glass as the frames flex over uneven surfaces. The sealing strip must act as a cushion between the frame and the screens, allowing movement but also maintaining a good seal.
It’s available from caravan spares suppliers as either butyl or mastic sealant strip. The heated screens are almost identical in thickness to the original glass, meaning all the old screw holes in the angled sections are retained. Take your time with the wiring and connections, and ensure you guard the connections against moisture and damp.
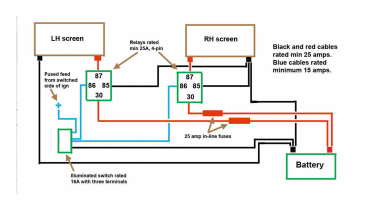
I wired the screens independent of the main loom for peace of mind, and to make any troubleshooting with other circuits easier in the future. Lastly, ensure your alternator or dynamo output is high enough to power the screens when the wipers, headlamps and heater motor are all working hard to give you the best visibility possible.
Tools
Wire strippers, crimpers, wiring, heat-shrink sleeving, heat gun, spanners, screwdrivers, drill
Time: 8 hoursCost: £193*
Contact Ricky Evans Motorsport 01287 283688 www.heatedwindscreen.com *Parts prices: £83.88 per screen; relays, switches and wiring £25; sealing strip £10
Wiring
Route the wiring after deciding the switch and relay positions, to avoid guessing the wiring lengths. I sleeved the wiring in the engine bay for tidiness and to isolate it from the rest of the loom. With 25 amps of current draw to contain, I used heat shrink insulation on all terminal ends to prevent moisture, and contact with other parts. Use proper crimpers for the terminals to ensure good connections. The earth feeds should run to firm contact points (not self-tapped screws). All wiring must be correctly rated: 25 amp for the screen feeds. Relays are 25 amp, 4-pin versions, and the switch is self illuminating. A timer relay giving typically ten minutes of on time could be used, though additional wiring is most definitely required.
Find a car with the experts
