How to replace Discovery 3 front hub bearing
Replacing a front hub on a Discovery 3 or Range Rover Sport should be quick and simple. Unless it’s seized. Ed Evans explains.
You may not even hear a worn hub bearing on a Discovery 3 or Range Rover Sport. Sophisticated suspension bushings and advanced soundproofing combine to insulate the driver from noise and vibration generated by the tyres on the road or the rotating axles and their bearings. But drive slowly, below 30mph and listen carefully for the low mechanical rotational grating from underneath the vehicle.
It’s heard from underneath, not necessarily from the front, because those bushes and insulation deaden the sound, spreading it around the underside. And forget about wheel bearings humming when cornering – that sort of thing is also drowned out, and in any case, the bearing behaves differently compared to the old suspension/axle systems. The way to confirm bearing trouble is to lift the wheels clear of the ground and, with the transmission in neutral, spin each wheel by hand, listening with your ear close to the hub. You’ll hear the grating, if it’s there.
If bearing deterioration has started, the sooner the hub is replaced, the less chance of failure becoming expensive. The bearings themselves are not available separately, the hub being designed to be swapped for a new one with new bearings pre-installed. That’s more expensive, of course, but it makes the job much quicker and simpler – assuming the components come apart as they’re supposed to, which they often don’t. It’s the old story again with Discovery 3 and Sport. If only there had been a tad of lubricant applied between the components during assembly, they would come apart much more easily. It might be a struggle to get the old hub out, but at least we can apply that missing lubricant to the replacement assembly in the hope of making things easier next time.
DIY option
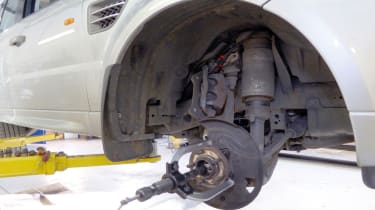
In the case of my own Sport shown here, I could just hear the rotating noise at slow speed, very slight, but enough to tell me there was something going on down below that warrantied investigation. I thought about doing this job in my home workshop and, on the face of it, it should be a DIY cinch, apart from surface rust holding the parts together. Fortunately I tackled it in Britpart’s workshop with development mechanic, Steve Grant, applying his invaluable combination of skill, patience and brute strength. So here we go with what, in theory, should be a quick and simple job, and we’re working on the right hand side front wheel. The Britpart number for the right hand hub on this vehicle is LR 014147, plus a new stake nut for the axle shaft, but confirm the correct part for your vehicle using the Vehicle Identification Number (VIN).
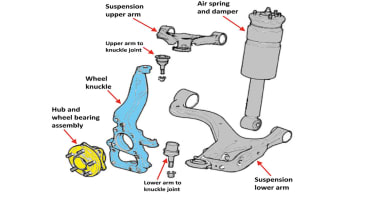
Here are the main parts that we’ll be dealing with, shown in blue and yellow on this exploded view of the main suspension components. The hub assembly is held to the knuckle by bolts screwed through and into it from the back of the knuckle.
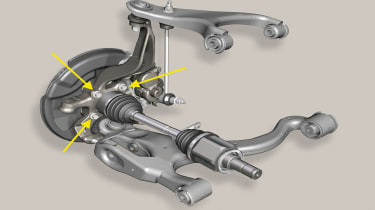
This is the full assembly looking from inboard, showing the axle drive shaft which passes through the knuckle and the hub. The arrows show the bolts in the back of the knuckle which hold the hub in place.
Results
After removal, the old hub was rotated by hand and felt almost as smooth as the new one. But when held to the ear and rotated, the difference was evident as a faint grating noise which would, of course, be magnified when the road wheel was turning under load. After fitting the new hub, the general change in noise level was more than might be expected, making the car exceptionally quiet. These early stages of wheel bearing wear can be difficult topin-point in the later models because the noise permeates all of the underside, and develops gradually, so is not always noticed until failure is near.
Time: 2 hoursCost: £50-170
Click on the gallery below for our handy step-by-step guide…
Find a car with the experts
