How to use a car tyre puncture repair kit
Everything you need to know about using a car tyre puncture repair kit - and when you shouldn’t!
A flat tyre has always been a big problem for motorists but, in an effort to increase efficiency and free-up space, more carmakers are doing away with a spare wheel and opting for a tyre puncture repair kit instead. These kits are designed to get your damaged tyre resealed, reinflated and back into road-worthy shape, so you can then drive that little bit further to a tyre replacement workshop.
While tyre puncture repair kits can indeed save the day in some cases, they need to be used correctly in order to be effective. They’re certainly not without their drawbacks, either. So, in order to prevent any mishaps, it’s important to understand exactly how they work.
Read on to find out everything you need to know about using your car’s tyre puncture repair kit correctly.
What is a car tyre puncture repair kit?
Advances in tyre technology and improved road surfaces have helped to reduce the frequency of punctures over the years, but they’re still a relatively common occurrence. While many cars carry a fully-sized or space saver spare wheel, an increasing number are driving around with no spare at all.
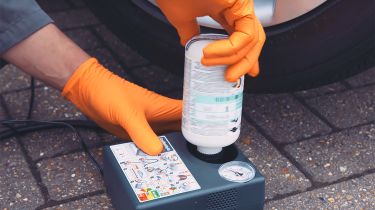
If your car has one of these puncture repair kits, you’ll probably find it lurking under the boot floor where a spare wheel would have resided. The centrepiece of this kit is a canister of sealant. In some models, this may also be accompanied by a portable air compressor that plugs into your car’s 12V accessory power socket. If you’re really lucky, you may get some free disposable gloves, too.
If you have a badly damaged tyre, you may feel a bit sceptical about this kit being up to the job of sealing it. Unfortunately, your concerns may be well-founded as these kits are only capable of sealing and temporarily repairing smaller punctures. If the damage is too great and the kit does fail, a telephone call to your breakdown recovery provider will be in order.
If the kit does seal the tyre successfully, allowing it to be re-inflated at the roadside, it’s important to remember that this is only a temporary fix. It’s imperative to get the tyre off the car and repaired professionally as soon as possible.
Another problem with repair kits is that a professional fitter may tell you they can’t repair the tyre you’ve filled with sealant, meaning you’ll have to buy a replacement. This may or may not be the straightforward truth, but it’s often company policy among the big repairers.
Why are car makers switching to puncture repair kits?
So if puncture repair kits are a mixed blessing, why are they supplied as standard on so many cars? The key reason is saving weight, as a hefty wheel and tyre can make a small but appreciable difference to fuel efficiency and CO2 figures, and manufacturers have targets to meet.
If you don’t want to rely on a puncture repair kit, there’s nothing stopping you from sourcing a spare wheel or space-saver when you buy your next car. Most cars will already have a spare wheel storage well in the boot, so it’s often a simple matter of swapping out the repair kit – although a proper spare is likely to be an extra cost option.
That said, drivers who do have a proper spare wheel may still choose to pick up a can of tyre repair foam or sealant from their local car accessory store. That way they’ll be covered for all eventualities too.
What if my car doesn’t have a puncture repair kit?
If your car doesn’t have a puncture repair kit or spare wheel for some reason, you will need to source one as soon as possible as having some means of replacing or fixing a puncture is a legal requirement. If you decide to purchase a kit, your local dealership should be able to supply one that is manufacturer-supplied or approved. Alternatively, aftermarket kits can be bought at automotive retailers.
How do I repair a puncture?
It should prove relatively quick and easy to use a puncture repair kit or a can of tyre foam, but that shouldn’t encourage you to be a risk-taker. If you’ve stopped with a puncture in a busy or dangerous spot, it’s often safer to drive slowly to a spot where you can pull off the road safely. A ruined tyre or buckled alloy wheel might be more costly to repair, but it could save your life.
The police and breakdown organisations advise that you should never attempt to repair or change a tyre on the motorway hard shoulder. Get everyone out of the car and behind the barriers, then call for help. Once you are in a safe place and are happy to carry out the repair using your kit, here’s how to do it:
1. Prepare the car
If you’ve stopped by the side of a road, it’s usually advisable to make sure all passengers are out of the car and standing safely away from potential traffic hazards.
- Switch off your engine and apply the handbrake.
- Turn on your hazard lights
- Wear a high-visibility jacket if you have one
- Open the boot to retrieve your puncture repair kit.
- Deploy your warning triangle behind the car at a suitable distance – if it’s safe to do so.
2. Inspect the puncture
Not all punctures can be repaired by tyre sealant. If any of the following apply, you’ll need to call your breakdown service for professional help:
- The tyre is obviously cut up or disintegrating.
- The puncture hole itself is greater than 4mm.
- The puncture is on the tyre shoulders or sidewall – not the main tread.
- Your wheel rim shows obvious damage that prevents the tyre seating properly
3. Insert sealant and reinflate the tyre
You may have already had to drive the car backwards or forwards by a few inches to rotate your flat tyre and make a puncture visible for inspection. If you’re satisfied there’s no serious damage, these basic rules apply when attempting to seal a tyre using tyre foam products or a puncture repair kit:
- Carefully read the instructions on the can, or in your vehicle handbook.
- Rotate the wheel so the puncture is at the top. Ideally the valve should be as high as possible too, but this won’t always be possible.
- Connect the sealant container to the tyre valve and insert the sealant.
- Some kits require you to connect the air compressor to the sealant container while the container is connected to the tyre valve. Other kits require you to remove the tyre sealant container and connect the compressor directly to the tyre valve. Read the instructions to determine the correct process.
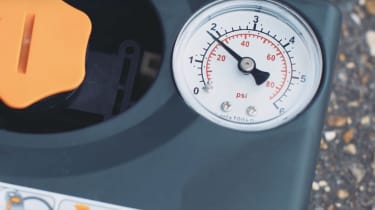
- Plug in the compressor to your car’s 12V accessory socket and inflate your tyre to the correct pressure – as per the handbook. The compressor should have an integrated gauge.
- If the repair is successful, arrange for a professional to fit a new tyre as soon as possible. If the repair fails, call for a breakdown recovery provider.
If your kit doesn’t include an air compressor then it may have a pressurised ‘all-in-one’ can of sealant instead. If this is the case, the sealant will be pushed into the tyre as it simultaneously reinflates.
Has my puncture repair kit worked?
Once you’ve attempted to re-inflate the tyre, you should have a pretty good idea straight away as to whether the repair kit has a chance of working. If there’s sealant leaking out of the tyre at a quick rate, do not attempt to drive on it. Call for recovery instead.
If the tyre appears to be holding some pressure then this is a promising sign. However, most kits require you to drive for a couple of miles in order to spread the sealant around and properly address the leak, so that’s the next task.
Stop somewhere safe after the required distance, and have another look at the tyre. If the sealant has worked you may still have lost some air during the process, so if you have a compressor you should check the pressure again and reinflate as necessary.
If you’ve used a pressurised can of tyre foam, all you can do is reassure yourself visually that the tyre is holding air and drive to a garage or tyre specialist.
Do I need to replace my tyre sealant?
Once you’ve used your sealant canister, you’ll need to replace it as soon as possible to prevent being caught out at a later date. This can be bought over the counter at your local dealership, or you may be able to source one online.
If you’re fortunate enough to avoid needing to use your sealant, it’s still important to make note of its expiry date. This date will be printed somewhere on the canister, and it’s a risky idea to use sealant that has expired. Again, you can purchase a replacement from your local dealership or online.
Why won’t tyre fitters repair sealed tyres?
It’s not true that you can’t repair a tyre that’s been sealed with tyre foam, and some tyre repair specialists may be prepared to take on a repair for you. However it’s a messy and time-consuming job to clean all the sticky sealant out of the tyre when it’s off the wheel, and most tyre fitters won’t do it.
They justify this stance by pointing out a tyre that’s not properly cleaned may have hidden further damage. There’s truth to this, too, because repairing one hole may not solve your problems if there’s another sealant-filled leak that’s accidentally overlooked. This could cause a dangerous blow-out further down the road.
Another problem is that if you’ve driven lots of miles at low pressure, you may have caused hidden damage to the structure of the tyre.
If you are sure that there is only one area of damage, and you haven’t been driving around on a flat, then you do have the option of ringing round the smaller local tyre-fitters in your area. You may find someone prepared to take on a repair.
Can you prevent punctures with tyre sealant?
Some tyre foam and sealant products are marketed as puncture preventers, but if you’re going to rely on them you need to take special care.
It’s possible, for example, that a tyre filled with pre-puncture sealant will effectively prevent the initial slow loss of pressure that’s so often an indicator of a major failure to come. So if a sharp object becomes lodged in your tyre you may not notice until it’s worked deeper into the rubber and potentially caused a more catastrophic tyre failure.
The only way to mitigate against this scenario is more regular and rigorous visual inspections of the tyre tread.
How can you avoid getting punctures?
While it’s impossible to avoid every scenario where you might pick up a puncture, looking after your tyres properly makes a great deal of sense.
Often, a tyre that loses pressure suddenly at speed while driving will have been leaking air slowly for some time in advance. You may think you’ve just had a puncture, but a stone or nail may have been embedded in a tyre for days or weeks previously.
Over time, the movement of the tyre against tarmac can exacerbate damage until a total loss of pressure suddenly occurs. So check your tyres regularly for pressure, and inspect the treads for foreign objects whenever you can – it's a hassle, but you can save yourself a lot of trouble.
Potholes can also cause punctures, so be observant for potential road surface issues and drive at speeds that allow you to take avoiding action if required. Likewise, try to avoid banging your tyres up and down kerbs while parking, as that’s a surefire way to damage tyre walls and rims.
Taking care of your tyres is important, here’s how to do it correctly…
Find a car with the experts


